Crib Into a Toddler Bed Hack
by:Aoqi
2020-07-10
I have a pair of three-year-old twins and I often hear people tell me \"you got two for one\" and I always answer \"no, I got two \"two\" for one price \".
The truth is, the cost of everything has doubled, so I save as much money as I can.
Nothing is more frustrating than watching your child grow up soon after you buy something.
I know the kids will soon grow up from a toddler bed, so I think why not if I can crack their crib?
So this is my simple DIY furniture hack that can turn your crib into a toddler bed.
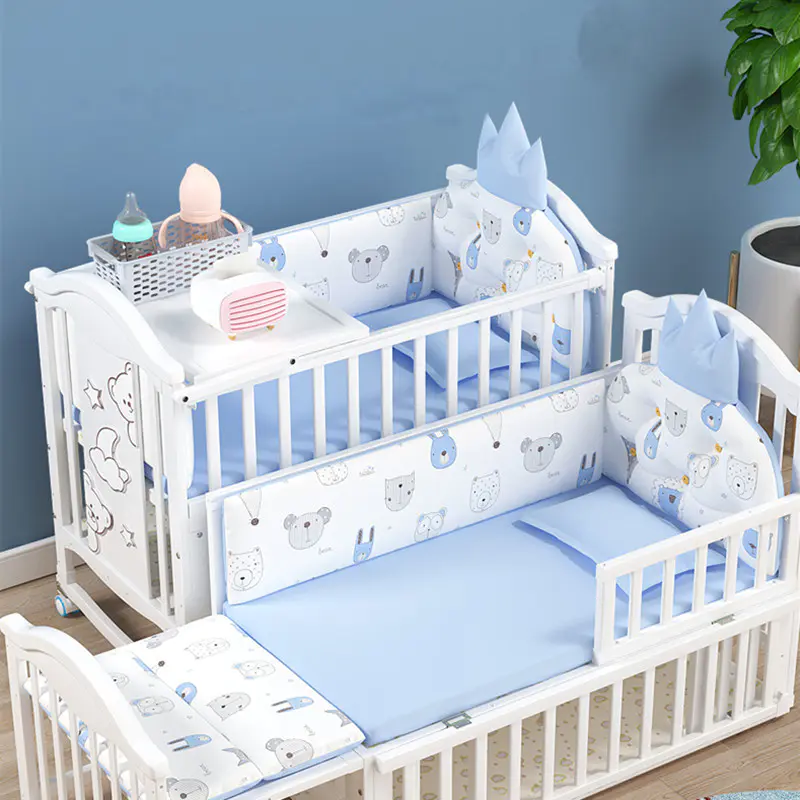
The crib we bought for the twins we are the kind of crib you can turn the bed into a toddler when your child grows up and then eventually into a full size bed.
Soon after we put our kids on the bed, and suddenly our kids will come back downstairs, we know it\'s time to transition to a toddler bed.
If you \'ve ever seen a toddler crawl out of a crib, the soil act (
Really nerve-racking)
You know what I mean.
I started doing it myself instead of buying two sets of a couple hundred dollars suit.
The result is a very solid solution, very simple and not only looks good (
Wife\'s request)
But can stand all the product tests of a pair of twins.
Depending on the wood you lay around the house, you should be able to put one of them together for less than $30.
Of course, all cribs are not the same, but you can adjust what I do with the same ideas and techniques to accommodate anything.
I will try to add some comments where changes in the design may work.
This hacker needs relatively few List materials.
If you do a lot of carpentry, you may already have most of what you need.
The only professional project I have ever used is the crown Bolt and cap nut to get it done well.
List of materials: 12\' x 3/4 \'board4\' x 3/4 \'board2\' x 2\' back inch crown column inch cap nut paint this building I used a Poplar Board, as I intend to paint them you are free to work for your specific crib using any type of wood.
In terms of the length of the bolt, make sure to measure the width of the wood on the baby bed that the Bolt will pass through and adjust accordingly.
You want to make sure that once the bolts go through the front plate and the crib there is enough space for the NUT to catch the plate, however, because the depth of the cap nut is limited, you want too much.
I used 2 inch bolts because the length of the two bolts together is 1/2, which makes the 1/2 nut perfect.
It collects your materials and lets build! . . . . . 1.
Measure Bolt height: There are four points on the front of the crib, they are the same on both sides, one is attached to the side column and the other is attached to the Batten that supports the mattress.
When the front of the crib is still connected, look at the back and measure the distance between the floor and these bolts.
I label them outside (
Attached to the bracket)and inside (
Attached to the Batten)
Proper handling of this issue will ensure that the crib is horizontal when you build a new front board. 2.
Cut the board into length: this should be very standard due to the standard size of the mattress, but this may be slightly different due to the width of the side support.
The length I used was 56 inch and left a slight over at the end. 3.
Remove the front of the existing crib: very self-explanatory. 4.
Measure the bolt width: this is another point that varies depending on your crib type.
What I do is use the side support as a reference and measure the holes on the support from the outside of the side support (
See Step 1 for \"outside)
And support for slats (\"inside\").
I then add the prominent part of the front plate here so that the correct measurement is obtained from the outside of the front plate to the hole. 5.
Marking and drilling: now you have the dimensions of the support bolts required to mark and drill.
I made two straight lines on each side, with a speed Square for each width, and then marked the correct height on each line. 6.
Connecting the board: tie the board in front of the crib to make sure it fits. 1.
Cut track Board: you can use any length you want here, but I chose 35 inch.
I want them to be long enough to keep the kids from rolling out of bed, but still give them a place to climb in and out. 2.
Cut the post: I cut the post 10 inch long, which gave them the right height to prevent the children from getting out.
Next, I cut the gap at each end.
The gap is 1/2 deep (
Same width as track Board)
3/4 wide (
So the track and side plates slide in.
You can cut these in a variety of ways, but I found that my clamp saw works very well. 3.
Glue the track plates to the pillars: Slide the tracks into the gaps you cut on the pillars to make sure they fit.
If they fit, then add some wood glue to the gap, clamp them, and leave them to dry on one side. 4.
Hit the grinder rails: Once the glue is dry at the seams, so they are as flush as the sharp edges. 1.
Connect the front board: tie the front board to the bed, then slide the side to the front board.
Figure out where you want the sidebar to sit.
There is no real science here, you just want to give the kids enough space to get in and out.
Make sure that the place you choose is the feet of the children when they sleep. 2.
Connecting the guide rail: drill through the guide rail and the front plate when appropriate, which will ensure that both the guide rail and the front plate are aligned.
Do so for both sides. 3.
Disassembly complete: remove the guide rail of the board and remove the front board from the baby bed. 1.
Finish edge: this is not necessary, but in order to give it some details and a more complete look, I decided to use a quarter inch circle on my router to finish the edge.
You can use whatever you like or match the overall look of the crib.
You can also skip the sanding of the workpiece so that any sharp edges can be removed. 2.
Final sanding: Using my random track sanding machine and some fine sand sandpaper, I gave it once to smooth the surface and remove some flaws for painting. 3.
Paint: If you are going to paint the wood, then paint it in any color you choose.
Prime is not necessary if you are going to dye, but you may want to consider a polyurethane to protect it from children.
I used spray polyurethane on some other projects and it worked very well.
Finish it: once the paint is dry, put it back together as you did in the model, that\'s it. . . your done.
Let the children do it.
I finished these a few months ago and they are still strong.
The children have certainly tested these and they have no problems.
You can extend these designs with any edge or other finishing touches you like and have fun.
Feel free to leave me a message about any comments or questions and I will be happy to answer any questions I can answer.
Thank you for taking the time to look at my project and I\'m sure I\'ll post a hack in the future to turn it into a full bed.
The truth is, the cost of everything has doubled, so I save as much money as I can.
Nothing is more frustrating than watching your child grow up soon after you buy something.
I know the kids will soon grow up from a toddler bed, so I think why not if I can crack their crib?
So this is my simple DIY furniture hack that can turn your crib into a toddler bed.
The crib we bought for the twins we are the kind of crib you can turn the bed into a toddler when your child grows up and then eventually into a full size bed.
Soon after we put our kids on the bed, and suddenly our kids will come back downstairs, we know it\'s time to transition to a toddler bed.
If you \'ve ever seen a toddler crawl out of a crib, the soil act (
Really nerve-racking)
You know what I mean.
I started doing it myself instead of buying two sets of a couple hundred dollars suit.
The result is a very solid solution, very simple and not only looks good (
Wife\'s request)
But can stand all the product tests of a pair of twins.
Depending on the wood you lay around the house, you should be able to put one of them together for less than $30.
Of course, all cribs are not the same, but you can adjust what I do with the same ideas and techniques to accommodate anything.
I will try to add some comments where changes in the design may work.
This hacker needs relatively few List materials.
If you do a lot of carpentry, you may already have most of what you need.
The only professional project I have ever used is the crown Bolt and cap nut to get it done well.
List of materials: 12\' x 3/4 \'board4\' x 3/4 \'board2\' x 2\' back inch crown column inch cap nut paint this building I used a Poplar Board, as I intend to paint them you are free to work for your specific crib using any type of wood.
In terms of the length of the bolt, make sure to measure the width of the wood on the baby bed that the Bolt will pass through and adjust accordingly.
You want to make sure that once the bolts go through the front plate and the crib there is enough space for the NUT to catch the plate, however, because the depth of the cap nut is limited, you want too much.
I used 2 inch bolts because the length of the two bolts together is 1/2, which makes the 1/2 nut perfect.
It collects your materials and lets build! . . . . . 1.
Measure Bolt height: There are four points on the front of the crib, they are the same on both sides, one is attached to the side column and the other is attached to the Batten that supports the mattress.
When the front of the crib is still connected, look at the back and measure the distance between the floor and these bolts.
I label them outside (
Attached to the bracket)and inside (
Attached to the Batten)
Proper handling of this issue will ensure that the crib is horizontal when you build a new front board. 2.
Cut the board into length: this should be very standard due to the standard size of the mattress, but this may be slightly different due to the width of the side support.
The length I used was 56 inch and left a slight over at the end. 3.
Remove the front of the existing crib: very self-explanatory. 4.
Measure the bolt width: this is another point that varies depending on your crib type.
What I do is use the side support as a reference and measure the holes on the support from the outside of the side support (
See Step 1 for \"outside)
And support for slats (\"inside\").
I then add the prominent part of the front plate here so that the correct measurement is obtained from the outside of the front plate to the hole. 5.
Marking and drilling: now you have the dimensions of the support bolts required to mark and drill.
I made two straight lines on each side, with a speed Square for each width, and then marked the correct height on each line. 6.
Connecting the board: tie the board in front of the crib to make sure it fits. 1.
Cut track Board: you can use any length you want here, but I chose 35 inch.
I want them to be long enough to keep the kids from rolling out of bed, but still give them a place to climb in and out. 2.
Cut the post: I cut the post 10 inch long, which gave them the right height to prevent the children from getting out.
Next, I cut the gap at each end.
The gap is 1/2 deep (
Same width as track Board)
3/4 wide (
So the track and side plates slide in.
You can cut these in a variety of ways, but I found that my clamp saw works very well. 3.
Glue the track plates to the pillars: Slide the tracks into the gaps you cut on the pillars to make sure they fit.
If they fit, then add some wood glue to the gap, clamp them, and leave them to dry on one side. 4.
Hit the grinder rails: Once the glue is dry at the seams, so they are as flush as the sharp edges. 1.
Connect the front board: tie the front board to the bed, then slide the side to the front board.
Figure out where you want the sidebar to sit.
There is no real science here, you just want to give the kids enough space to get in and out.
Make sure that the place you choose is the feet of the children when they sleep. 2.
Connecting the guide rail: drill through the guide rail and the front plate when appropriate, which will ensure that both the guide rail and the front plate are aligned.
Do so for both sides. 3.
Disassembly complete: remove the guide rail of the board and remove the front board from the baby bed. 1.
Finish edge: this is not necessary, but in order to give it some details and a more complete look, I decided to use a quarter inch circle on my router to finish the edge.
You can use whatever you like or match the overall look of the crib.
You can also skip the sanding of the workpiece so that any sharp edges can be removed. 2.
Final sanding: Using my random track sanding machine and some fine sand sandpaper, I gave it once to smooth the surface and remove some flaws for painting. 3.
Paint: If you are going to paint the wood, then paint it in any color you choose.
Prime is not necessary if you are going to dye, but you may want to consider a polyurethane to protect it from children.
I used spray polyurethane on some other projects and it worked very well.
Finish it: once the paint is dry, put it back together as you did in the model, that\'s it. . . your done.
Let the children do it.
I finished these a few months ago and they are still strong.
The children have certainly tested these and they have no problems.
You can extend these designs with any edge or other finishing touches you like and have fun.
Feel free to leave me a message about any comments or questions and I will be happy to answer any questions I can answer.
Thank you for taking the time to look at my project and I\'m sure I\'ll post a hack in the future to turn it into a full bed.
Custom message